This content has been created exclusively for the University of New Mexico.
This content has been created exclusively for the University of New Mexico.
Please watch the above video in its entirety! Thank you!
Designing Brand Identity; pages 2-10; pages 34-38; pages 70-76. This reading selection introduces some of the brand basics and processes to develop a brand.
Brand Thinking; pages 24-39 and pages 127-139; This reading selection follows 2 interviews about influences that create a brand. One interview is about culture, the other interview is about the creativity of two familiar brands.
Please know that we will be quizzed on these readings!
This first week will be largely review for those that took CJ 374 with me during the Summer. We will doinga series of exercises in Photoshop. Some of the images we create can later be used in other projects, so keep this in mind as you being to choose & create these images, colors and the creative direction your term will take. The image shown below demonstrates a sucessfully completed example of this exercise.
Please do NOT submit the work you did last term! Thank you!

In this exercise, we will be using Adobe Photoshop as a vehicle for more exploration with color. This will also teach us about Layers, Layer Modes, Layer Groups, Adjustment Layers and some effects.


In this first video we will do a quick review of Adobe Photoshop's UI and toolset, along with some critical info that will help us avoid difficult problems within Photoshop.
This is the first of 3 step by step instructional videos that will guide us through the successful completion of the 'Painting with Light exercise.'
In this second video of three, we will start to apply the filters and layer structure that will comprise our Painting with Light composition.
In this final video section we will complete the colorization of the remaining layers - completing the Painting with Light exercise and composition.
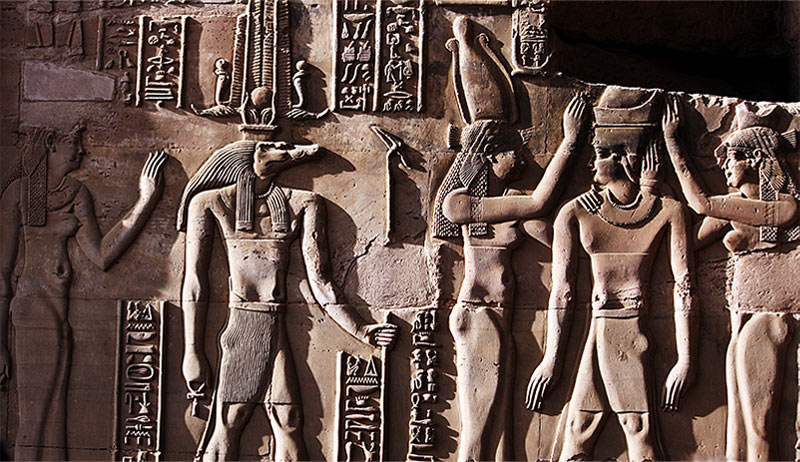
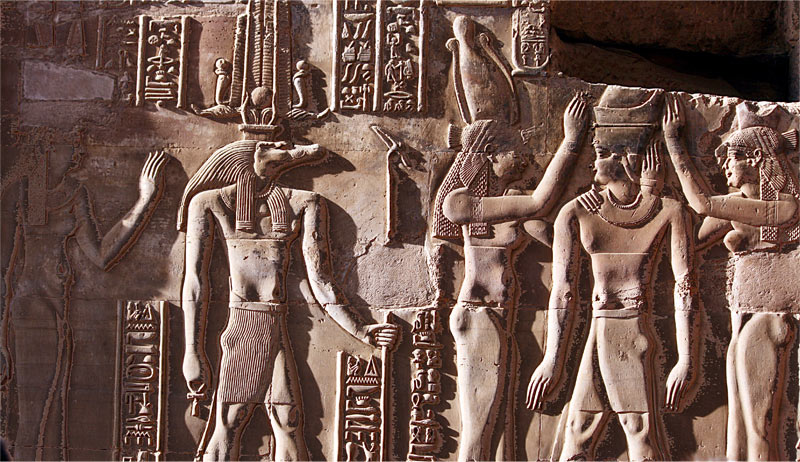
In this brief exercise we will perform a 'curves' adjustment to the Sobek_0319 Egyptian photo. As we can see in the images above, the 'curves' adjustment will soften the harsh shadows and reveal additional details in the photo. Download the Sobek Egyptian image here.
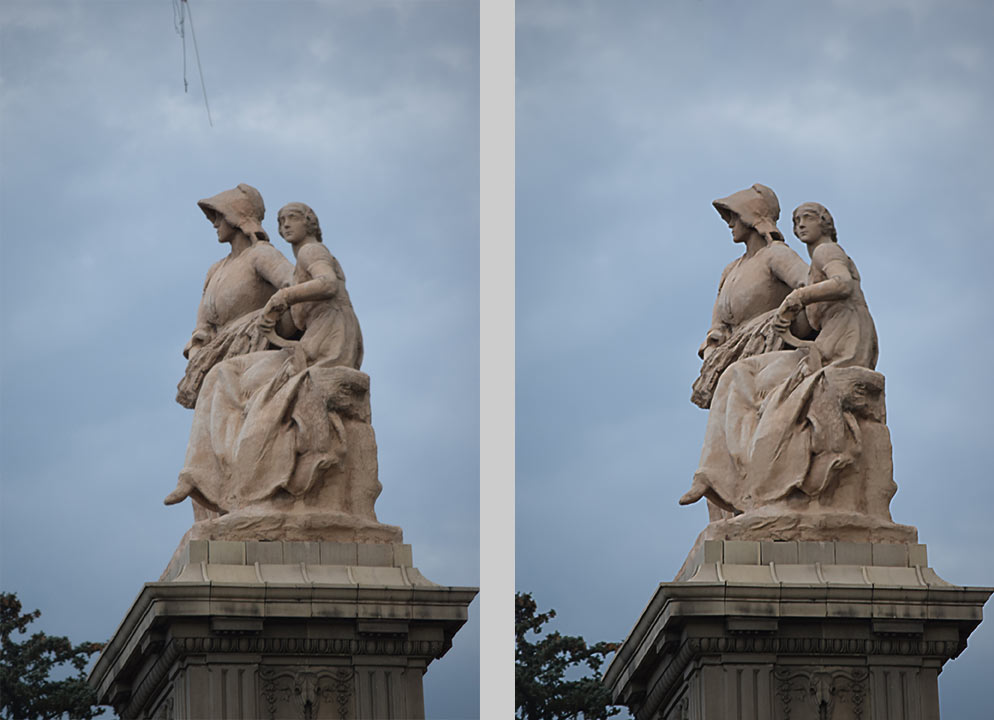
In this first exercise we will look at a quick and easy method of removing the rope and sharpening the image. Download the Madonna of the Trail.jpg here.
In this exercise we will look at methods of acquiring accurate selections. Additionally we will look at 'masking' techniques we will need to create any collage, poster and perform integration and composition of images. This is known as a transparent background. Please use one of your own images for this exercise. Try to select an image that can be used in other projects, such as our business ID, poster and portfolio.
Please double check your work to make sure that there are NO stray pixels left in the transparent background areas. Any pixels left in the background are referred to as 'dirt'. This MUST be cleaned up! Thank you! Please do NOT submit any work done in a prior term.

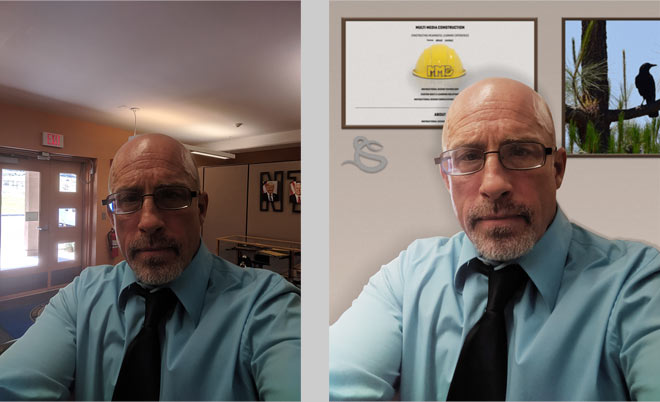
In this (surprisingly quick) exercise we will learn to apply the protrait technique demonstrated in the image[s] above. We will choose one of our curated images for this task.
We will be submitting a screen shot of the images we download each week for instructor review. This will be for points.
For those who have taken CJ 374, this will be review - to a very brief extent! Please know that we are going to delve into this in much greater depth this term. We will look at methods of acquiring images that we can use in our work! We also must look at acquiring our own images, which is actually the very best method of acquiring images. The percentage of everyday people that have the ability to take photos at any given moment has got to be approaching 90% or better - just a guess.
The point is that many of the cameras we have on our phones are capable of taking print quality pictures. That said, we must still apply sound and established principles of photography. If you are not well informed on the subject, there are many good results that come from a simple search. This is a good one, (except for the editing in the phone idea - I am a Photoshop person and would NEVER do that), The School of Photography.com - Tutorials: How to Take Good Photos With a Phone.
I personally invested in a nice 'prosumer' Nikon that has served me well. If you have access to a better camera, that will of course be a better path to take. But, we do not always have our professional gear with us and then our cell phone cameras are golden to have for 'shots of opportunity'. These are somtimes the best photos and their sincerity comes through to the viewer. Well planned and staged shots should be the most successful. We'll discuss this further - after this first exercise: